The best way learn about Apache Cassandra is to install and play with it. We will cover five ways to install Apache Cassandra for development purposes. The five ways covered are :
- Installing a single node Apache Cassandra on your development machine.
- Installing a multi node Apache Cassandra cluster on your development machine.
- Running Apache Cassandra in Eclipse
- Installing a multi node Apache Cassandra cluster using Cassandra Cluster Manager (CCM)
- Installing a multi node Apache Cassandra cluster using Vagrant
Prerequisites
Please note you require the most stable version of Java 7 setup on your machine. Please ensure that JAVA_HOME is set up correctly.
Installing a Single Node Cassandra
To install a single node Cassandra server on your development machine use the following steps:
- Ensure you have Java 7 installed on your development machine.
- Download the latest stable version of Apache Cassandra from http://Cassandra.apache.org/download/
- Unpack the downloaded archive.
- Go to the conf directory and open up Cassandra.yaml in your favourite editor
- Make sure that you have write permissions to directories specified in these properties. Alternatively change each of these directories to a custom location.
- data_file_directories – /var/lib/Cassandra/data
- commitlog_directory- /var/lib/Cassandra/commitlog
- saved_caches_directory – /var/lib/Cassandra/saved_caches
- logs – /val/log/Cassandra
- Ensure the following properties in the Cassandra.yaml file are set correctly
- rpc_address – IP Addresses that will be allowed to make connections to Cassandra. This is by default set to localhost. Thus only connections to localhost will be accepted. Change this to 0.0.0.0 to accept connections for any host or leave it as localhost if you are only going to access the install from your machine.
- seeds – Cassandra uses seed nodes to discover the topology of the ring. This should be set to localhost.
- listen_address – IP address used by other nodes to connect to the node that is being configured. This should be left as localhost.
- Start Cassandra using the command.
bin/Cassandra -f
. This will start Cassandra in the foreground.
- In order to test that your installation is working open a new terminal window and navigate to the CASSANDRA_INSTALLATION_DIR/bin directory and execute the cqlsh.
- You should now be at the cqlsh prompt.
Installing a Multi Node Cassandra Cluster
It is possible to install a local Cassandra Cluster. There are a number of things that need to be done to accomplish the same. In practice this involves the following:
- Copying an existing Cassandra installation
- Providing independent/non conflicting locations for the following directory related properties in the Cassandra.yaml file.
- data_file_directories
- commitlog_directory
- saved_caches_directory
- commitlog_directory
- Each Cassandra installation needs to have different listener_addresses and rpc_addresses. The trick lies in using different loopback addresses for each of the installed nodes. The important thing to know is that any address within the 127.0.0.0 to 127.255.255.255 is mapped back to a loopback address.
- Each Cassandra node needs to have a different JMX port to listen on for incoming connections.
I have written a small script to make this an easy process. The script takes two parameters
- The name of the tar file i.e. the latest stable release of Apache Cassandra downloaded from http://cassandra.apache.org/download/. Please note the bash script needs to be in the same directory as the tar file.
- Path for the directory where you wish all the nodes to get installed.
Please note the script below will only work on Linux.
#!/bin/bash
CASSANDRA_TAR=$1
TAR_EXTRACTS_TO=<code>echo ${CASSANDRA_TAR} | cut -d'-' -f1-3</code>
CAS_CLUSTER_HOME_DIR=$2
CAS_NUMBER_OF_NODES=3
read -p "Are you sure you wish to install a 3 node Cassandra cluster ${CAS_CLUSTER_HOME_DIR} (y/N): " -e -i Y REPLY
REPLY=<code>echo ${REPLY^^}</code>
if [ ${REPLY} != "Y" ]
then
exit 1
fi
read -p "Start newly installed Cassandra cluster (y/N): " -e -i Y START_CASS
START_CASS=<code>echo ${START_CASS^^}</code>
read -p "Number of nodes in the cluster. Default is set to ${CAS_NUMBER_OF_NODES}:" -e -i ${CAS_NUMBER_OF_NODES} CAS_NUMBER_OF_NODES
mkdir -p ${CAS_CLUSTER_HOME_DIR}
mkdir -p ${CAS_CLUSTER_HOME_DIR}/commit/
mkdir -p ${CAS_CLUSTER_HOME_DIR}/data/
mkdir -p ${CAS_CLUSTER_HOME_DIR}/saved_caches/
mkdir -p ${CAS_CLUSTER_HOME_DIR}/logs/
cp ${CASSANDRA_TAR} ${CAS_CLUSTER_HOME_DIR}
cd ${CAS_CLUSTER_HOME_DIR}
for i in $(seq 1 $CAS_NUMBER_OF_NODES)
do
mkdir -p ${CAS_CLUSTER_HOME_DIR}/${TAR_EXTRACTS_TO}-${i}
tar -xf ${CAS_CLUSTER_HOME_DIR}/${CASSANDRA_TAR} -C ./${TAR_EXTRACTS_TO}-${i} --strip-components 1
sed -i '1 i MAX_HEAP_SIZE="256M"' ${TAR_EXTRACTS_TO}-${i}/conf/Cassandra-env.sh
sed -i '1 i HEAP_NEWSIZE="100M"' ${TAR_EXTRACTS_TO}-${i}/conf/Cassandra-env.sh
sed -i "/listen_address\|rpc_address/s/localhost/127.0.0.${i}/g" ${TAR_EXTRACTS_TO}-${i}/conf/Cassandra.yaml
sed -i "s|/var/lib/Cassandra/data|${CAS_CLUSTER_HOME_DIR}/data/${i}|g" ${TAR_EXTRACTS_TO}-${i}/conf/Cassandra.yaml
sed -i "s|/var/lib/Cassandra/commitlog|${CAS_CLUSTER_HOME_DIR}/commit/${i}|g" ${TAR_EXTRACTS_TO}-${i}/conf/Cassandra.yaml
sed -i "s|/var/lib/Cassandra/saved_caches|${CAS_CLUSTER_HOME_DIR}/saved_caches/${i}|g" ${TAR_EXTRACTS_TO}-${i}/conf/Cassandra.yaml
sed -i "s|/var/log/Cassandra/|${CAS_CLUSTER_HOME_DIR}/logs/${i}|g" ${TAR_EXTRACTS_TO}-${i}/conf/log4j-server.properties
sed -i "s|7199|720${i}|g" ${TAR_EXTRACTS_TO}-${i}/conf/Cassandra-env.sh
if [ ${START_CASS} == "Y" ]
then
${CAS_CLUSTER_HOME_DIR}/${TAR_EXTRACTS_TO}-${i}/bin/Cassandra -f &amp;
fi
done
The script will install Cassandra and start all nodes for you.
Running Apache Cassandra in Eclipse
It is always useful to be able browse Cassandra’s source code. There is nothing better than the code to help truly understand Cassandra.
Before proceeding please make sure the following are installed on your machine.
- Ant version 1.8 and above
- Git
We will checkout the latest stable Cassandra release. For this tutorial I have chosen Cassandra version 2.0.9
Run the following lines of code in a terminal window
# Note we will first check out the trunk and then switch to the appropriate branch
git clone http://git-wip-us.apache.org/repos/asf/Cassandra.git Cassandra-2.0.9
cd Cassandra-2.0.9
git checkout tags/Cassandra-2.0.9
ant build
ant generate-eclipse-files
We will now go through the process of importing the project into Eclipse and launching Cassandra from Eclipse. I am assuming some familiarity with Eclipse.
- Start Eclipse and create a new workspace.
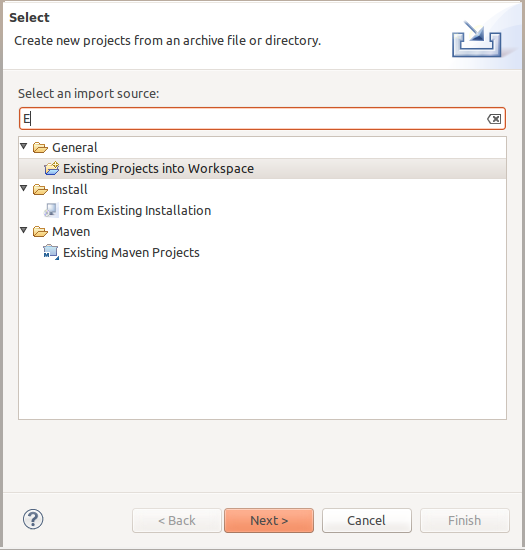
- Import the project into Eclipse. From package explorer choose import and then use the existing project into workspace option.
- When asked to choose the root directory navigate to the Cassandra-2.0.9 directory and press finish.
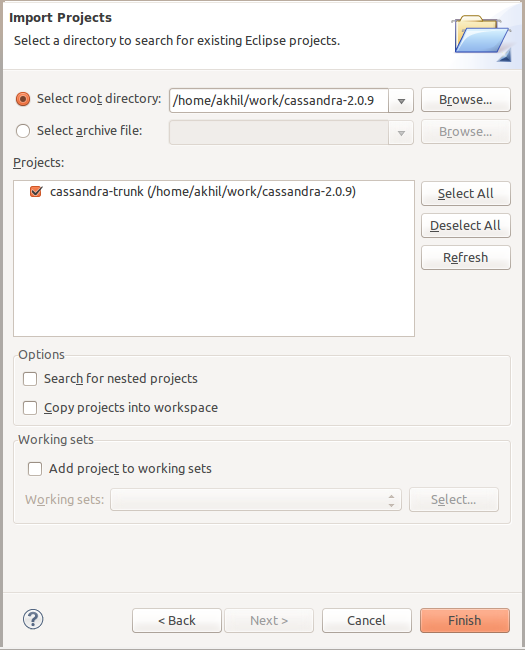
- The project should load into eclipse.
- Now create a run configuration with the following VM arguments. Obviously adjust the paths for your requirements.
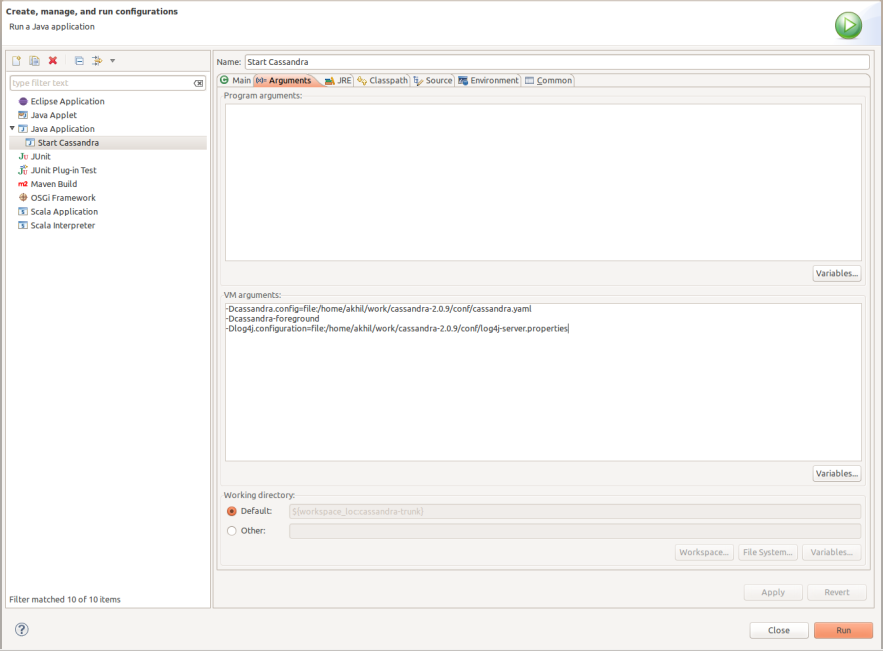
- Now open up the Cassandra.yaml file specified in your run configuration and add appropriate values to the following properties.
- data_file_directories
- commitlog_directory
- saved_caches_directory
- logs
- Run the newly created run configuration.
- Now navigate to the following directory Cassandra-2.0.9/bin
- Run cqlsh and connect to your running Cassandra instance.


Installing a Multi Node Cassandra Cluster Using CCM
Cassandra Cluster Manager is a tool that enables one to create multi-node Cassandra clusters on a local machine. Tyler Hobbs from DataStax has written a good blog on using CCM for creating multi-node cluster on a local machine.
Installing a Multi Node Cassandra Cluster Using Vagrant
Vagrant is an automation tool for creating and configuring Virtual Development Environments
Brian Cantoni has some good videos, scripts and tutorials on using Vagrant to setup Cassandra development environment. I highly encourage you to check them out.
No comments yet.